Sunday, April 22, 2012
Two Classic Salon Dryers
I was so lucky the other day to pick up a classic 1960s vintage Rayette (actually "Rayette Dorado") salon dryer to add to my collection. Well it is a collection now since I now have two types, the other being the Bonat salon dryer from the same era which I picked up a few years ago.Vintage salon dryers do show up quite regularly on ebay and similar places, but due to the cost of shipping you really have to wait till one is within driving distance, and this one was.
In case your wondering what a Rayette dryer is like, here is a photo:
It should actually look shiny since it is beautiful chrome, but I had to use a flash camera since it was late at night and that made it look dark rather than shiny.
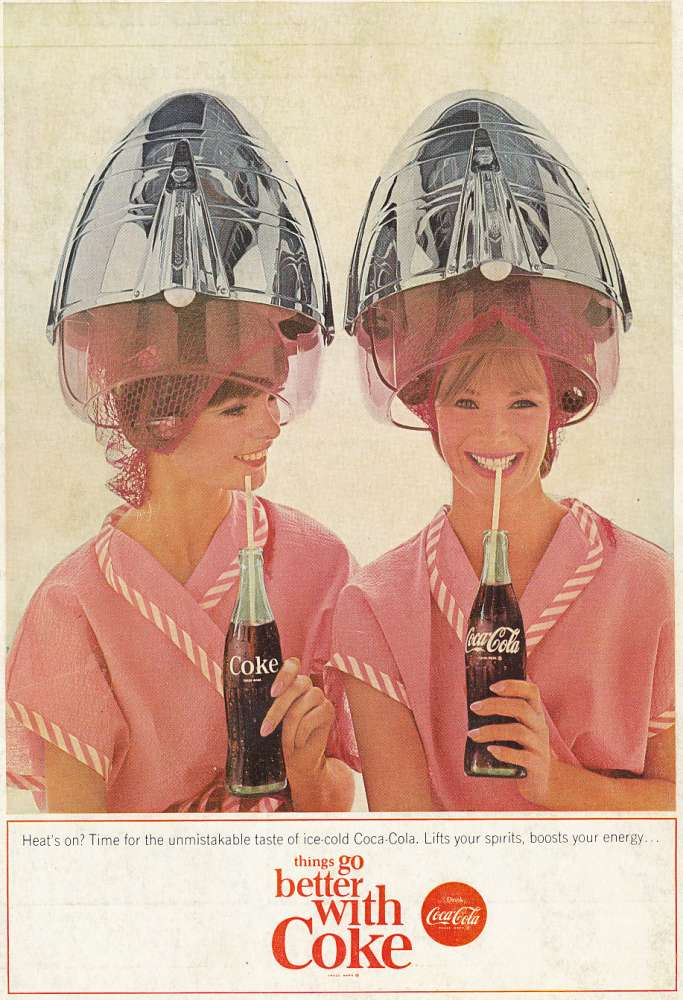
Its very similar to the dryers in the classic Coke ad, but not quite the same:
Does anyone know if the dryers in the ad are Rayette dryers as well, or another brand?
So how to do a fair comparison between the Rayette and Bonate? First thing was to do a classic 1960s style set with vintage plastic brush rollers, neatly wound and close together to be as was typical of that era. Then, to take another technique from that period, instead of using any form of setting gel or lotion, I rinsed my hair after it was in curlers and blotted it a little before going under the dryer. Apparently this was done in some salons (or at home? anyone know?) in the 60s in an attempt to achieve that always elusive perfect set, the idea being that it would best hold the set if it was good and wet around the rollers before drying. After drying under the Rayette, I waited half and hour and then re-rinsed and dried under the Bonat, and this turned out to be a great way to compare both dryers.
A Bonat dryer in case you haven't seen one:
So were the dryers any different? Yes. The Rayette was hotter, but I'm not sure if that was really the dryers or the old temperature controls being a little different. The Rayette took 45 minutes to dry, the Bonat 60 minutes. But the experience itself was different. The Bonat conveniently opens, making getting under it much easier and also has a larger opening even when closed. With the Rayette, you pull the dryer forward but have to duck under it. It also has a smaller opening, (look in the photo how the plastic part of the hood is curves inwards) and you inevitably bump your curlers while going under. I was only wearing medium size rollers, so it would be even trickier with large ones.
For convenience, the Bonat easily wins, but that isn't the complete story. The Rayette is quieter but seems to blow air around quite a bit more forcefully. The curved plastic part of the hood also keeps more of the warm air within the dryer rather hitting your face, lower neck and shoulders, so its a little nicer to be under. And to be fair, had I not done a comparison back to back, the differences would have been much less noticeable. So for comfort, the Rayette is slightly better.
In the end, each of the two dryers has slight advantages, but they are both great. If you looking for a vintage dryer and see either type for sale, grab it and you will be pleased you did: drying a vintage set with either a wonderfully relaxing and enjoyable experience.
Monday, January 30, 2012
1960s Pillows for Overnight Sets
Its always important to find the right pillow for a comfortable night set in curlers, and it hardly a surprise that in the 60s when sleeping in curlers was so common, that a number of pillows made just for that purpose appeared on the market. Somehow these two survived the decades in their original packaging. Take a look:


I have tried the second one and it its really great to snuggle up with although the foam in it isn’t as bouncy as it originally must have been. Haven’t tried the first one yet, and I'm somewhat hesitant to open the plastic it having survived so long unopened. Perhaps I'll update this when I try it sometime!
Wednesday, January 4, 2012
How to condition and wetset your hair at the same time
A wonderful friend, Fran Gauner, who is a hairdresser in New York and an absolutely great person was kind enough to let me in on her method of conditioning hair while doing a wetset.
Here is her technique:
Fran's Original Conditioning Method
1) Shampoo and then apply Infusium 23 leave in conditioner to you hair.
2) Set it on small rollers and cover it with a showercap.
3) Sit under a hot dryer for at least an hour or more, then the remove the showercap and dry.
Then let your hair cool and you will have have the softest tightest curls and well conditioned hair (her words!).
If your home all day and have the time, for an even better result, do the above in the morning, and then (with the showercap off) let your hair dry until the next morning. The curls will last for days and stay soft. (unless it gets damp as with any wetset). While Franni's uses small rollers, of course use the most appropriate rollers and setting pattern for your hair and desired style. She recommends doing this about once a month.
A Modified version of Franni's Conditioning Method
I have used Franni's method so often, and it really is great. But one thing I find is that I can't leave the showercap on too long or perspiration gets caught inside and is, well, icky. And of course, that limits the benefit of conditioning. So here is what works so well for me. Take a showercap and use a hole punch to make lots of holes in it about 2cm or ¾ inch apart. Look at the photo below:

The holes let moisture escape, but only slowly, so at least for an hour or two under the dryer hair will still be damp with conditioner allowing the conditioner to do its magic although still drying gradually. If you play around with the number of holes in your showercap, you can find the right amount so that it takes perhaps 2 hours or more to almost fully dry, where the first hour and a half is really conditioning. Once you have the shower cap's holes adjusted properly, a conditioning set becomes easy: condition, put on showercap and then no worries for two hours under the dryer and your done. Or just be more sparing with the holes and take the showercap off after the conditioning phase and then dry as you otherwise would.
As always. be sure your hair is completely dry before removing the rollers or your set will fall out.
Here is her technique:
Fran's Original Conditioning Method
1) Shampoo and then apply Infusium 23 leave in conditioner to you hair.
2) Set it on small rollers and cover it with a showercap.
3) Sit under a hot dryer for at least an hour or more, then the remove the showercap and dry.
Then let your hair cool and you will have have the softest tightest curls and well conditioned hair (her words!).
If your home all day and have the time, for an even better result, do the above in the morning, and then (with the showercap off) let your hair dry until the next morning. The curls will last for days and stay soft. (unless it gets damp as with any wetset). While Franni's uses small rollers, of course use the most appropriate rollers and setting pattern for your hair and desired style. She recommends doing this about once a month.
A Modified version of Franni's Conditioning Method
I have used Franni's method so often, and it really is great. But one thing I find is that I can't leave the showercap on too long or perspiration gets caught inside and is, well, icky. And of course, that limits the benefit of conditioning. So here is what works so well for me. Take a showercap and use a hole punch to make lots of holes in it about 2cm or ¾ inch apart. Look at the photo below:
The holes let moisture escape, but only slowly, so at least for an hour or two under the dryer hair will still be damp with conditioner allowing the conditioner to do its magic although still drying gradually. If you play around with the number of holes in your showercap, you can find the right amount so that it takes perhaps 2 hours or more to almost fully dry, where the first hour and a half is really conditioning. Once you have the shower cap's holes adjusted properly, a conditioning set becomes easy: condition, put on showercap and then no worries for two hours under the dryer and your done. Or just be more sparing with the holes and take the showercap off after the conditioning phase and then dry as you otherwise would.
As always. be sure your hair is completely dry before removing the rollers or your set will fall out.
Friday, December 16, 2011
Christmas 1960s Style
Merry Christmas to everyone and the Best wishes for the New Year!
Thanks to every one who has been reading my blog or better yet, commented or emailed/messaged me! Unfortunately November/December was very busy so I really didn't get around to posting much. I hope I will have more time next year.
The December issue of many vintage magazines have special Christmas hairdo instructions, not surprising given in many ways people apparently dressed up more (or better!) in those days than we do now. I'm going to cheat a bit and post a few pages from Hair Secrets from December 1970, so just past the end of the decade but a very nice how to do typical aspects of fancy Christmas styles. Take a look:


Virtually all the holiday styles would have been done with wetsets, and since may households were not lucky enough to have a dryer, sleeping in curlers would have been the most common way to dry. But with longer hair on medium or small rollers, hair wouldn't always dry completely overnight (and as you may know, it must be totally dry for a set to take). Redbook in 1962 provided and answer - wear a turban over your curlers.

The turban above is apparently over the rollers below. You really wouldn't know it!
The article refers to "the frequent sets of the holiday season" and that you could use the turban for shopping trips, picking up guests from the train station (yes, people didn't fly much in those days) or even go to a luncheon with it. One can only imagine there would have bene frequent checking of the turban to make sure it is on properly!
Thanks to every one who has been reading my blog or better yet, commented or emailed/messaged me! Unfortunately November/December was very busy so I really didn't get around to posting much. I hope I will have more time next year.
The December issue of many vintage magazines have special Christmas hairdo instructions, not surprising given in many ways people apparently dressed up more (or better!) in those days than we do now. I'm going to cheat a bit and post a few pages from Hair Secrets from December 1970, so just past the end of the decade but a very nice how to do typical aspects of fancy Christmas styles. Take a look:
Virtually all the holiday styles would have been done with wetsets, and since may households were not lucky enough to have a dryer, sleeping in curlers would have been the most common way to dry. But with longer hair on medium or small rollers, hair wouldn't always dry completely overnight (and as you may know, it must be totally dry for a set to take). Redbook in 1962 provided and answer - wear a turban over your curlers.
The turban above is apparently over the rollers below. You really wouldn't know it!
Monday, November 14, 2011
The best salon dryer photo ever!
Sunday, November 13, 2011
How long does it take to set your hair?
Lack of time is often the reason why not to do a classic wetset. But how long does it really take? I timed myself last night - trying to do it quickly: 11 minutes is all it took. Take a look:

Unfortunately not the greatest picture. I had to choose between flash for a clear shot, but washed out colors, or fuzzy and better colors. Took the better colors. Not the neatest set in the world, but I was going to prove speed, not perfection. You can see the double piks in each curler for nice even tension and comfort. And certainly done well enough for sleeping in. 12 hours later curlers still securely set and ready to be removed.
Thursday, November 10, 2011
Braun Floating Bonnet Dryer
This dryer was originally from Germany (Braun is a German company). This ad from the 60s (translated) says you can hardly feel the dryer as is floats on a cushion of air, and is so quite you can even make a phone call. Not in my experience, at least with the North American version. The fan isnt that strong, and the top of the dryer dyer which holds the fan sits on your rollers. The fan is also quite loud, being almost right on you're head. Its too bad - it sounds so to have a hood blow up and float nice an securely on your curlers while you go about your business. Maybe those dryers worked better when they were new. Has anyone else any experiences with them? The lady in the ad certainly looks happy with her dryer. Maybe its the first dryer she had and the luxury of a home dryer more than compensated for any shortcomings it had.
Subscribe to:
Posts (Atom)